How to Clean Baseboard Heaters: Easy Steps for Electric and Hydronic Units
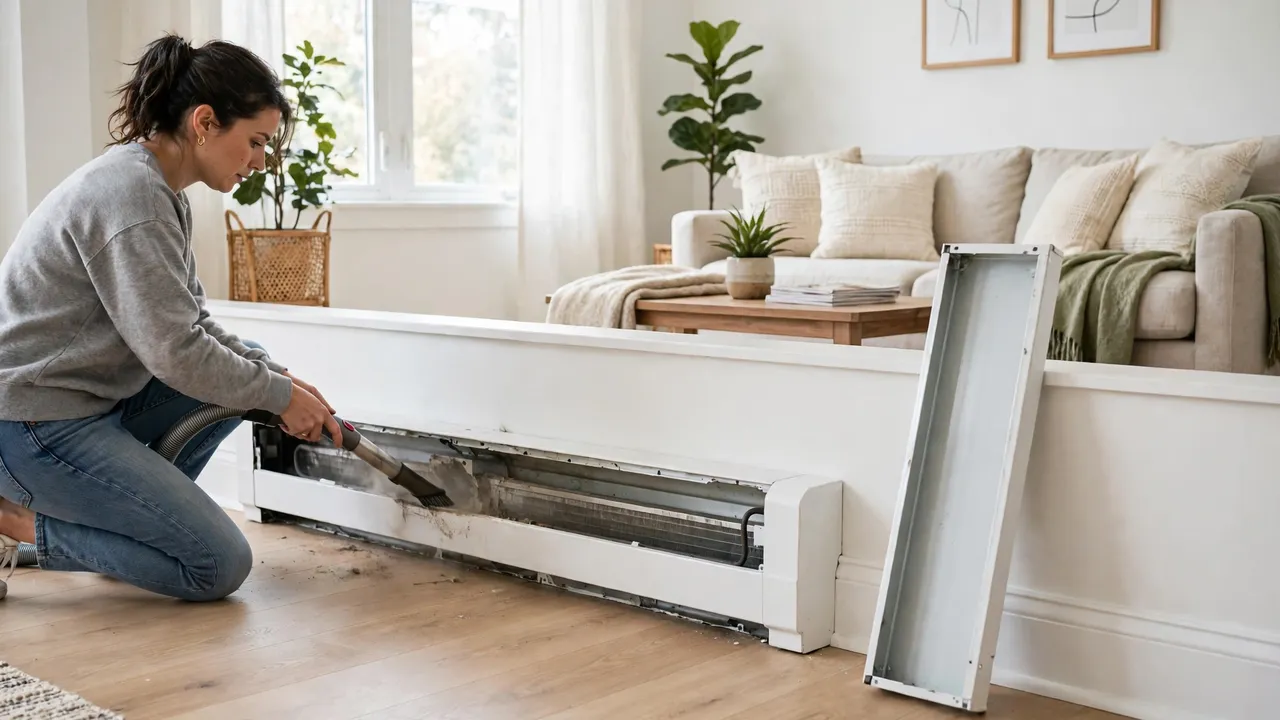
Baseboard heaters work quietly all winter, and dust builds up inside them just as quietly. That dust is not harmless. It blocks the flow of warm air, makes the heater run longer, and causes the burnt-dust smell many homes notice on the first cold day. The good news: cleaning a baseboard heater takes about 20 minutes per unit, needs tools you already own, and makes a real difference to heat and air quality.
This guide covers both common types — electric baseboard heaters and hot water (hydronic) units — because the safe way to clean them is slightly different. Every step is written in plain order, with the mistakes that can damage the thin metal fins inside.
What you need
- Vacuum cleaner with a brush or crevice attachment
- Soft brush (an old paintbrush or a bottle brush works well)
- Microfibre cloths
- Bucket of warm water with a few drops of mild dish soap
- Needle-nose pliers (only if some fins are bent)
- Work gloves — cover edges can be sharp
- A dust mask, if the unit has not been cleaned for a long time
First, know which type you have
| Electric baseboard heater | Hot water (hydronic) heater | |
|---|---|---|
| How it heats | An electric element inside the unit | Hot water from a boiler flows through a copper pipe |
| Before cleaning | Turn the thermostat down AND switch off the breaker for that circuit | Turn the heat down and wait until the unit is fully cool |
| Water rule | Never let water touch the inside or the element | Keep water away from valves and pipe joints |
Not sure which type you have? Electric units usually have their own thermostat on the wall or on the unit and a power cable. Hydronic units connect to pipes at one or both ends. When in doubt, treat it as electric and keep water away from the inside completely.
How to clean baseboard heaters, step by step
Step 1: Turn everything off and let it cool
For an electric heater, turn the thermostat to its lowest setting, then switch off the correct breaker in your electrical panel. For a hydronic heater, turn the heating down at the main thermostat. Wait until the unit feels completely cool to the touch — at least 30 minutes after it last ran. Never clean a warm heater: the fins can burn skin, and dust sticks harder to warm metal.
Step 2: Clear the area
Move furniture, curtains and rugs away from the heater. You need open space to lift the cover off, and this is also a good moment to check the clearance: baseboard heaters need roughly 6 to 12 inches of free space in front of them to move air well and stay safe.
Step 3: Take off the front cover
Most covers lift up from the bottom and pull out towards you. Some are held by small screws or end caps that slide off first. Wear gloves, because the cut edges of the cover can be sharp. Do not force anything — if the cover will not move, look for a screw at each end. Set the cover aside on a towel.
Step 4: Vacuum the fins
Inside you will see a row of thin aluminium fins around the element or pipe. This is where almost all the dust hides. Run the vacuum's brush attachment slowly along the fins, from one end to the other, and let the brush do the work. Go gently: the fins bend easily, and bent fins block air. Vacuum the floor under the unit and the wall behind it too, because loose dust there gets pulled straight back in.
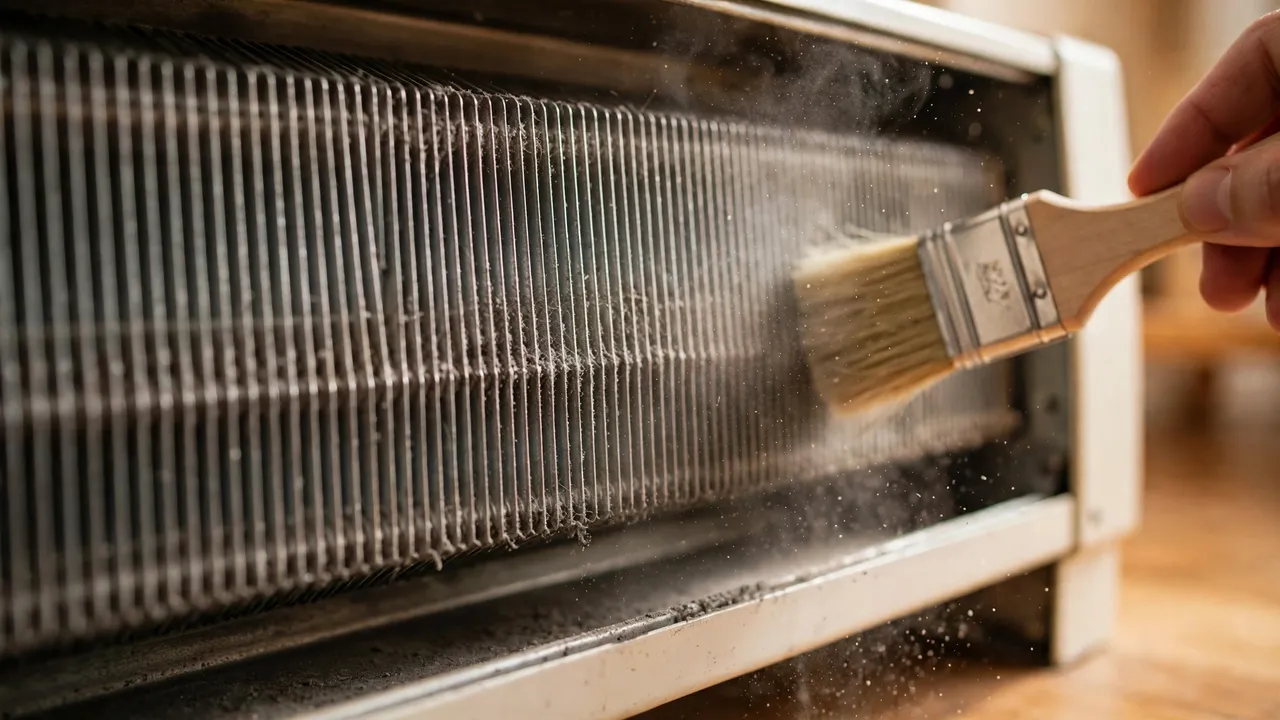
Step 5: Brush out the stuck dust
For dust packed between the fins, push the soft brush lightly between them while holding the vacuum nozzle just below. Short, gentle strokes work better than force. If you find fins that are already bent flat, you can ease them back into line with needle-nose pliers — grip the fin lightly and straighten it a little at a time. Even spacing between fins is what lets warm air rise freely.
Step 6: Wash the cover
The removed cover can be washed properly in a sink or bathtub with warm water and a few drops of dish soap. A cloth or soft sponge takes off the grey film that builds up over a season. Rinse it, then dry it fully with a clean towel. A cover that goes back damp can rust, and on an electric unit any leftover moisture near the element is a bad idea.
Step 7: Wipe the outside parts that stay on the wall
Wring a microfibre cloth in the soapy water until it is damp, not wet. Wipe the end caps and any fixed grille parts, then wipe again with a cloth dampened in plain water. Dry everything with a second cloth.
Step 8: Put it back and test
Hook the top of the cover over its tabs first, then press the bottom edge in until it clicks or sits firm. Replace any screws. Turn the breaker or heating back on and run the heater for a few minutes. A faint smell on the first run is normal if a little dust remained deep inside; it should clear within the hour. A strong smell that keeps coming back means dust is still packed in the fins — switch off, let it cool, and repeat steps 4 and 5.
How to fix a rusty or yellowed cover
Covers often pick up small rust spots near the floor, especially in bathrooms. Rub light rust gently with fine steel wool or a paste of baking soda and water, wipe clean, and dry well. For a cover that has yellowed with age, a wash with warm water and a little white vinegar usually helps. If the paint itself is damaged, you can repaint the cover once it is off the wall — use heat-resistant spray paint, let it dry fully outdoors, and never paint the fins or the element.
How often should you clean baseboard heaters?
- Once a year, minimum: at the start of the heating season, before the first cold week.
- Twice a year: if you have pets, smokers in the home, or anyone with dust allergies.
- A quick vacuum of the outside: every month or two in winter takes two minutes and slows the build-up inside.
Cleaning at the start of the season also removes the main cause of that first-day burnt smell: a summer's worth of dust cooking on a hot element.
Mistakes that damage baseboard heaters
- Spraying water or cleaner inside an electric unit. Water and the element must never meet. Vacuum and brush only.
- Cleaning while the unit is still warm. It risks burns and smears dust into the fins.
- Pressing hard on the fins. Bent fins choke the airflow you are trying to restore.
- Using a steam cleaner. Steam drives moisture deep into the unit and can damage wiring and valves.
- Blocking the heater afterwards. A sofa pushed against the unit undoes your work and is a fire risk.
Keep the whole room breathing easier
Clean heaters are one part of a fresher home. The same start-of-season routine is a good time to freshen the rest of the room: our guide on how to polish stainless steel covers kitchen metalwork, and if your home uses a tower fan in summer, how to clean a Dreo tower fan shows the same vacuum-and-brush method for its blades and grille.
Frequently asked questions
Why does my baseboard heater smell like burning when I first turn it on?
Dust that settled on the fins and element over the summer burns off on the first hot run. A deep clean before the season starts prevents most of it. If the smell is strong, lasts for hours, or comes with smoke, switch the heater off and have it checked.
Can I clean baseboard heaters without removing the cover?
You can vacuum the outside and the visible slots, and that helps. But most dust sits on the fins behind the cover, so a full clean needs the cover off. It is designed to come off — on most models it lifts up and pulls out by hand.
Is it safe to use water inside a baseboard heater?
No for electric units — never let water reach the element or wiring. For hydronic units, keep water away from valves and joints. In both cases, all wet cleaning happens on the removed cover, away from the wall.
What if some fins are badly bent or crushed?
Straighten what you can gently with needle-nose pliers. A few damaged fins will not ruin the heater, but a long crushed section cuts its heat output. If the element or pipe itself is damaged, that is a job for a heating technician.
Do clean baseboard heaters really save energy?
Yes. Dust acts like a blanket on the fins, so the heater must run longer to warm the room to the same level. Clean fins release heat into the air freely, so the room warms faster and the system cycles off sooner.
When should I call a professional instead?
Call a technician if you see frayed or discoloured wiring on an electric unit, leaks or heavy rust at hydronic pipe joints, or a heater that stays cold in one section. Those are repair jobs, not cleaning jobs.
Sources
Method cross-checked against manufacturer care guidance (Cadet baseboard heater instructions: power off, cool fully, vacuum, avoid touching the element) and established home-care references including Family Handyman and This Old House (convection and fin care). Written in our own words for A Natural Day readers.

Written by
MD DOLAR HOSEN
Technology expert and the founder and author of A Natural Day. He tests and reviews everyday tech, gadgets, and home essentials, and writes practical buying gui…
Comments (0)
Join the discussion — sign in to leave a comment.
Sign in to commentNo comments yet. Be the first to share your thoughts.